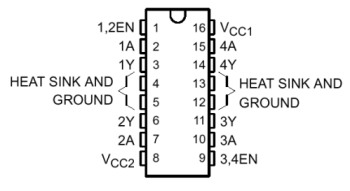
| EN (enable) ports | Must be high to turn on the chip |
|---|---|
| A ports | Inputs |
| Y ports | Outputs (connect to motors) |
| Ground | Connect all ground pins to ground (0V) |
| VCC1 | Connect to 5V |
| VCC2 | Connect to 6V for full power |
Using our water model from before, think of a motor as a big waterwheel in the river, that spins when water flows past it. What happens when you suddenly try to stop the flow of water? The wheel keeps spinning for a while, and pumps water through your circuit. (This is not just because there is a physical axle spinning here, but mainly because of the magnetic fields created by the motor coils.) This extra pumping can cause flash floods (spikes) of 50 or 100 volts that can do damage to the rest of the circuit. How do you deal with these spikes? The same way Champaign-Urbana dealt with the boneyard flooding "problem" - build detention basins. Capacitors are detention basins for electricity: they can store a lot of extra charge and release it when needed. Put these all over your circuit, especially right on the motor terminals (I will show you how). The direction of the big capacitors is important - put them in so that they will get voltage in the right direction most of the time.